Start with the space a chair needs
Mark the table footprint on the floor and measure to walls, door swings, cabinets, and other fixed objects. As a practical starting point, leave about 36 in (91 cm) from the table edge where a diner needs to pull out a chair. Where someone must walk behind a seated diner, plan closer to 44–48 in (112–122 cm). The NKBA seating guidance uses 36 in without through traffic and 44 in for walking behind a seated person; actual access needs can require more space.
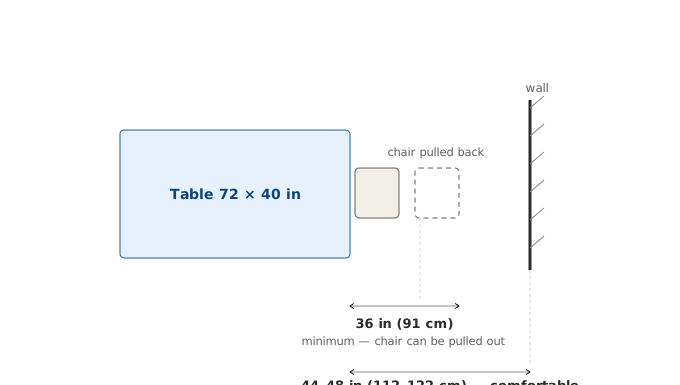
Try the same measurement with chairs pulled out. If a door, sideboard, or walkway intersects that zone, move or reduce the table before choosing finishes.
Choose a table for the seats you actually use
Allow roughly 24–26 in (61–66 cm) of table edge per person as a first check, then account for chair width, table legs, and serving space. Wayfair's dining table size guide gives that range. A 72 × 40 in rectangular table can be a useful six-seat layout example: two chairs along each long side and one at each end. Test the actual chairs before buying because arms and table legs can change the usable space.
In a compact room, compare a round or oval footprint with a rectangular one. An extendable table can preserve daily circulation while adding seats when guests arrive. Draw both options at their real dimensions rather than choosing by a product photo.
Size the rug for the pulled-out chairs
A useful starting rule is for the rug to extend at least 24 in (61 cm) past each table edge. For the 72 × 40 in example, that makes a minimum planning rectangle of 120 × 88 in (305 × 224 cm). IKEA recommends roughly 24–28 in on each side so chairs stay on the rug as they move.
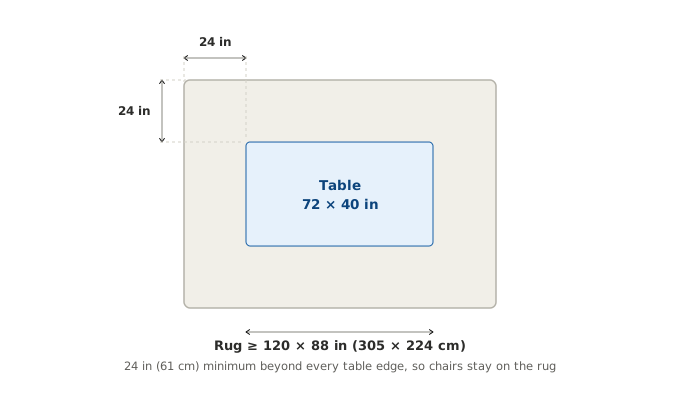
Low-pile or flatwoven rugs make chairs easier to move and clean, according to the same IKEA guide. If the larger rug crowds a small room, compare the layout without a rug.
Place the pendant after the table
For a dining pendant or chandelier, start around 30–36 in (76–91 cm) above the tabletop, then check eye line, shade size, and ceiling height. IKEA's chandelier guidance also suggests a fixture about half to two-thirds the table width. The illustration shows a 30–34 in example within that range.
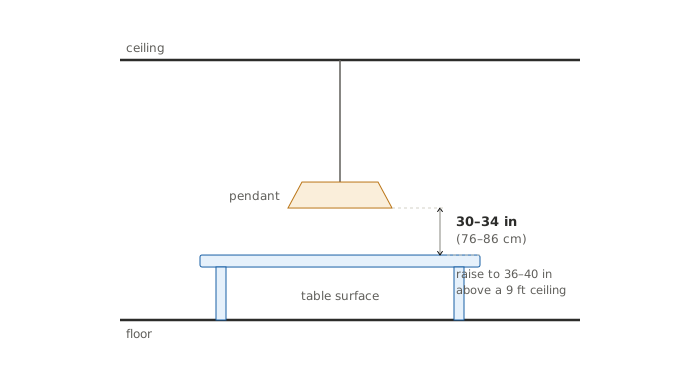
Position the fixture over the table rather than the room's geometric centre. If the table moves, a ceiling hook or an adjustable fixture may be easier than committing to a new junction-box position.
Test two layouts before decorating
- Draw the actual room, including doors, windows, radiators, and built-in furniture.
- Place the table and chairs at their measured sizes. Mark the 36 in and 44 in circulation zones.
- Compare the everyday layout with the extended or guest layout.
- Switch to 3D for sightlines, pendant position, and furniture scale.
- Check the free plan's export resolution, watermark, or project limit before spending time on a polished design.
This sequence gives the tool a specific job: verify whether the dining room works, then show how it might look.
Which room design tool fits the job?
These are starting points based on official plan and feature pages checked September 29, 2026. “Free” refers to access described by the vendor, not to a hands-on test of the final file.
| Tool | Best starting task | Documented free entry | Check before committing |
|---|---|---|---|
| Planner 5D | Try several furnished 2D and 3D layouts. | Unlimited projects and access to half of the furniture catalog. | Realistic renders and the full catalog are Premium features. Plan source ↗ |
| RoomSketcher | Draw a measured plan and test 3D views. | Two starting credits and one AI floor-plan conversion are listed. | A DIY project, 3D floor plan, or 3D photo can each use credits. Credit source ↗ |
| Floorplanner | Make a quick browser-based floor plan. | Up to five free projects; SD Lite exports are 960 × 540 px and watermarked. | Higher resolution and watermark-free exports require a project upgrade. Project-level source ↗ |
| Homestyler | Explore a furnished 3D view and lighting ideas. | Basic lists unlimited 1K rendering and a large free model library. | 4K rendering is a separate purchase; the paid Pro+ tier lists watermark removal. Plan source ↗ |
| HomeByMe | Plan and decorate a room with product models. | Starter lists two projects, five Full HD images, and unlimited 2D/3D screenshots. | The plan comparison lists a watermark on Starter 2D floor-plan exports. Offer source ↗ |
Need a broader comparison? See how to choose a home design app or the public-store value ranking. The ranking's score is a store-data estimate and is separate from this layout advice.
Sources and scope
The measurements are planning guidance rather than building-code requirements or a guarantee that any furniture combination will fit. Check local access requirements and the actual product dimensions for your project. The five software descriptions above come from vendor documentation; plan terms can change.